- Introduction -
-Story/Outline
- Characters -
-Main Characters
- Information -
-Bosses
-Equipment
-Items
-Game Secrets
-Heart locations
-Warp Points

Games featured:


|
|
The Legend of Zelda Bosses
|
The Light World

|
Image
|
Name
|
Description
|
Prize
|

|
Armos Knights
Eastern Palace
Screenshot
Ganon's Tower
Screenshot |
You must have the bow and arrows to fight this boss. When you encounter them they will shake themselves awake and begin to march around the room in a circular fashion. They will move to line up against the rear wall and then repeat the circle march. Hit each one of them with three arrows to defeat them, and when there is only one left it will become red and charge after you, either hit it with your sword a few times or another three arrows to defeat it. You will have to fight this boss again in Ganon's Tower, but it will be easy as you'll probably have the silver arrows by then. |
 |

|
Lanmolas
Desert Palace
Screenshot
Ganon's Tower
Screenshot |
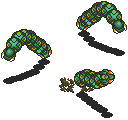
When you enter the room, the three large worms will emerge from under the sand and fly across the room and again dive underground. As they come out rocks will fly around so be careful. Hit the head of each one as it appears until they explode. The final one will throw more rocks out at you until you defeat it. Again they will be much easier in Ganon's Tower as you should have by then the level 4 sword. |
 |

|
Moldrum
Mountain Tower
Screenshot
Ganon's Tower
Screenshot |
When you enter the room, you will find that Moldrum is moving around on a platform with no barriers around it. He moves around in random patterns and if you touch him you'll be thrown back with the chance of falling down to the floor below. Try not to let this happen as he will regain his health once you come back up. Hit the red tip of his tail to damage him, it should take about six hits to defeat him, but be careful as he'll start to move around faster after the fourth hit. You should only have to hit him twice in Ganon's Tower to defeat him with the strongest sword. |
 |

|
Agahnim
Hyrule Castle
Screenshot |
When you encounter Agahnim, he will make Zelda disappear and he will vanish behind a curtain. Slash the middle curtain to reveal a door and enter. Agahnim will be waiting for you. He will become a black circle and move around the room. When he reforms he will shoot out an energy ball at you or a multiple ball which will fire in a directions when you hit it. If he appears at the top of the room facing down and doesn't look at you as you move around him, be careful and quickly move to the side of the room as he will shoot down massive bolts of lightning. You cannot hit him phisically, so when he fires the energy balls at you, strike them before they hit you so they will fly back at him and cause damage. You will have to do this about six times to defeat him. Once you defeat him, he will draw you into the Dark World. |
Access to the Dark World |
The Dark World

|
Image
|
Name
|
Description
|
Prize
|

|
Helmasaur King
Dark Palace
Screenshot |
The Helmasaur King is huge but has his weakness. He can whip at you with his tail which causes heavy damage so stay close to his face when is tail swings fast, and be careful of the energy balls that multiply when he fires them. To defeat him, use bombs or the hammer to blow off his mask. Once the mask shatters, it will reveal a large green gem on his forehead. Be careful though as he will now move around faster than before. Hit the green gem with arrows and after a few hits he will explode. |
 |

|
Arrghus
Swamp Palace
Screenshot |
You will need the Hook Shot to defeat Arrghus. All he will do is float around the room and try to slam into you. He also stops every now and then and the balls attached to him will spin around him in a large circular pattern. Fire the Hook Shot at him and you will grab off one of the small balls attached to him. It will become blue and try to re-attatch itself with the main eye. Strike the small balls twice to destroy them, and keep snatching and destroying them until none are left. The main eye will jump up out of the screen and attempt to flatten you as it flies down again, and then swims around the room bouncing off the walls. Hit it with a spin attack or a normal strike and after a few hits it will explode. |
 |

|
Mothula
Skull Woods
Screenshot |
Mothula is surrounded by spike traps that fly across the room, so you will have to dodge a lot of obstacles here. He will shoot out three energy beams that you must avoid, and he will sometimes try to ram you. Shoot fire at him with the Fire Rod and he should blow after a few hits, and if you run out of Magic Power, just strike him with your sword. |
 |

|
Blind
Thieves' Town
Screenshot |
In this level you must locate Blind, as when you enter the boss' room, there will be nothing there. First, go up to the room dircetly above the boss room and you will find a crack on the ground with sunlight shining on it. Set a bomb and throw it on top of the crack. The bomb will blow a hole in the floor, allowing light to enter the room below. Later on in the level you will find a girl in a dungeon cell who asks you to take her outside. Before going to fight Blind, make sure that you find the Titan's Mitt first. Go back to the boss room and lead the girl into the light. The door will slam shut and the girl will become Blind. He will fly across the top and bottom of the room and shoot energy beams at you. When you hit his head three times it will come off and he will grow another head. After there are two heads flying around the screen, hit him three more times with a total of nine hits and he will explode. |
 |

|
Kholdstare
Ice Dungeon
Screenshot |
You will drop down into the room containing the boss, but Kholdstare will be encased in an ice block. Use the Bombos Medallion to melt the ice, and Kholdstare will come out. There will be three eyes moving around, and there will also be ice blocks falling from the ceiling. Try to avoid the ice and strike each eye until they explode. |
 |

|
Vitreous
Misery Mire
Screenshot |
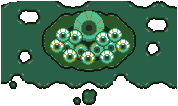
Lying in his own mess, you will find Vitreous in a pool of slime. The small eyes will come out and try to ram you, so you must keep hitting each eye until they explode. Try to stay in the right corner of the screen, as the main eye will often rise up from the slime and shoot down lightning bolts similar to Agahnim's. Once all the small eyes are gone, the large eye will start to charge at you. Use the bow and shoot arrows at it until it explodes. |
 |

|
Trinexx
Turtle Rock
Screenshot |
Trinexx is a three-headed monster who is quite strong. The fire head on the left will occasionally shoot out flames at you and the ice head on the right will shoot out ice which will make the floor slippery. Also be careful of the main head, as when you see its tail lash faster than normal, the head will shoot out of the body and try to slam into you. Go for the ice head first. Shoot it with the Fire Rod and it will turn red and freeze. When it does this hit it with your sword and repeat the process until it explodes. Then shoot the fire head with the Ice Rod to freeze it, and hit it with you sword. When both heads are gone, the entire rock body will explode and the main head will emerge. It will be a large snake-like creature and it will charge after you. The center of the snake will flash red indicating its weak point. Hit this point with your sword three times to finish it off. |
 |

|
Agahnim
Ganon's Tower
Screenshot |
This time you will have to fight Agahnim at the top of Ganon's Tower. He will create two illusions of himself, which will also fly around the room and shoot energy balls at you. Agahnim won't use the lightning bolt attack again, but he still has the energy ball the shoots in all directions when you hit it. Use the same strategy as before, and deflect all of the energy balls back to the real Agahnim. After about six hits he will fall and you will see Ganon rising up out of his body. Ganon will become a bat and escape to the Pyramid, smashing a hole through the top of it. |
 |

|
Ganon
Dark World Pyramid
Screenshot |
Ganon will greet you in a large room inside the Pyramid and will taunt you. He will use four forms of attacks before you can defeat him. Remember that you must have the Silver Arrows before you fight Ganon.
1. His first attack will be a large trident that he will throw at you. He will then teleport to another part of the room and continue throwing the trident at you. Keep hitting him with the sword.
2. After a few hits balls of fire will begin to spin around him and expand to fill the room and then shrink back. When they return around him, each ball will become a fire-bat and fly straight at you, so be careful of them. Continue hitting Ganon until his trident disappears.
3. Once his trident vansihes, He will shoot out a fire trail that flies around in an expanding circle. When you hit him before he can teleport to send out another fire-trail, he will jump up and smash down on the ground, which will cause the outer floor perimeter of the room to cave in. He will then teleport and each time you hit him he will continue to slam the ground until the entire border of the room is gone, then he will taunt you again.
4. The two flame torches at the rear of the room will extinguish, and the room will become dark. Ganon will disappear, and shoot out a fire beam at you. Avoid the fire and quickly light the torches again to reveal him. When he is solid, hit him with your sword and he will freeze and turn blue. Before he unfreezes, hit him with a silver arrow and he will begin to lose power. The torches will go out again, so you'll have to re-light then. Just make sure that he doesn't knock you down the hole, as you'll end up outside the Pyramid and you'll have to start the battle again from the beginning. Once you repeat this process four times and hit him the fourth time with a silver arrow, he will finally explode, the Dark World will vanish and the Triforce will return the Golden Land to its former glory. |
 |
 |
 |
|


